Of all the non-magnifying optical sighting systems the OOS could be both the simplest and the least known. A commercial version is presently produced and sold in the US. Named the SeeAll, most Australian shooters are not yet aware of it (as of late 2016) but could find a visit to the web site interesting.
The OOS is so simple that it’s practical to home build basic versions of it, and that’s been the go in my man cave for a while now. The following describes my efforts in putting the OOS idea to work for various forms of short range shooting as an alternative to a red-dot sight.
Popular red-dot sighting systems are usually an improvement on basic open sights but they sacrifice attributes that could be sadly missed. These could include, low cost, light weight, compactness, and suitability for use at very close range. The latter not only requires functional aiming down to almost powderburn distances but low sight height above the bore axis. Anyone who has tried to
shoot small vermin up close will know why – more on this later. The OOS system need not require compromise on any of these good things about traditional open sights and can work better too.
Before exploring practical applications let’s look at how the system works. Similarity with the normal front bead and rear “u” notch of the common open sight is a good place to start. By making the “u” notch much larger and filling the space with a simple lens, of the right specifications, you’d have a working example of an OOS.
There are a few important lens specifications. One is the focal length. That needs to match the distance to the front sight. Another is the location of the optical centre of the lens. It needs to be a little bit below the top edge of the lens and located at a point that corresponds to the top centre of the original “u” notch. That location of the optical centre would have the gun firing to the same point as it did before modification. A small margin of lens area above it’s optical centre is needed to avoid having an unwanted direct view of the front sight obscuring the
wanted direct view of the target when aiming.
Consider the advantages gained by this arrangement. You’ll find that the image of the front sight seen through the lens is in clear focus simultaneously with the image of the target seen directly above the lens. So you can use a six o’clock hold as with normal open iron sights. Another thing, focus at target distance also means collimated at target distance. That makes exact alignment of the front and back sight no longer necessary for accurate aiming. Just two clear objects need be lined up, much easier than three objects, especially as only one of those three can be in clear focus at any instant. The front sight image moves to correctly indicate impact as long as you are seeing it through the lens. In other words, parallax free for practical purposes.
Where speed in getting a shot away is at a premium, the sight can also work as an improvement on the old OEG (Occluded Eye Gunsight), also called “collimator sights” when they appeared in the nineteen seventies. An OEG requires the shooter to keep both eyes open and see the image of the target from one eye while the other eye’s view of the target is blocked (occluded) by the image of a
collimated aiming dot on a black background. Depending on the brain’s ability to keep both eyes pointed at the target, the dot will be superimposed on the landscape image in the brain to indicate point of aim. I used one of these collimator sights on a general-purpose shotgun for a few years.
The collimator/OEG worked well as a shotgun sight but not well enough for reliable use on a rifle. It was great for fast shooting but it all went bad if you tried to take extra care to improve accuracy, as you well might, if using it on a rifle. The OEG allowed the eyes to go out of sync in the extra time used being careful, so accuracy was destroyed rather than improved. Put a lens cap on the front of a red-dot sight to simulate an OEG and you will be able to study this phenomenon.
With a little practice, and a well fitting stock, the OOS allows the shooter to naturally adopt a technique that uses the sight initially in OEG mode with a smooth transition to the more accurate six o’clock aim mode if time permits. Good stock fit is easy to achieve as the OOS can be made relatively small and mounted low enough to suit a stock made for use with open sights. This in turn
removes the need for a large lens, as the stock makes it fast and easy to correctly position the eye.
Admittedly in some roles this very basic Open Optical Sight arrangement is a technically backward step compared to the red-dot concept where the parallax-free dot floats on a wide window view of the target and all of it’s surrounds. That reduces eye placement issues caused if poor stock fit is unavoidable. An extreme example is when used on a handgun and there is no stock to help with eye alignment. So it seems unlikely this new concept will ever bump the better quality red-dots off their perch. The cheaper ones are not so safe however as they are often not well enough made to deliver the theoretical advantage, often being found to suffer poor parallax correction and/or a dim target image due to inferior image splitting optics.
The OOS is much simpler and avoids these problems even in a cheap homemade version. The direct view of the target means brightness is undiminished as no image splitter is used. But more important, even using a salvaged plastic lens from a pair of $5 discount store reading glasses will make the aiming point parallax-free for accurate short range shooting. Add the advantages of a lower sight height and the inexpensive OOS starts to look like a winner in the low price bracket.
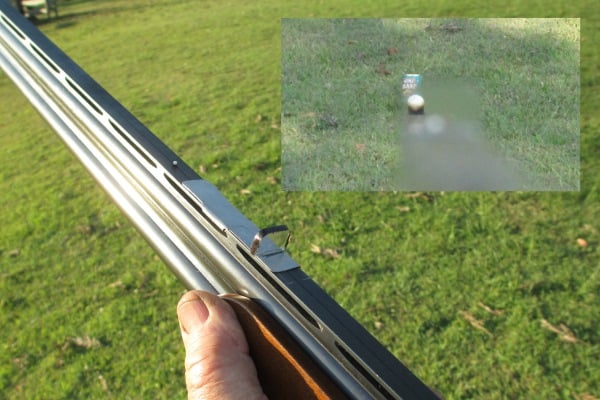
 Where better stock fit is made possible by a low sight line above bore axis the OOS is competitive with the red dot in quick aiming. Even more important is the advantage of a low sight height when shooting small targets up close. For instance, you might be culling vermin inside a farm building. Target range might be from one to ten metres so a low powered air rifle would do the job. See the
photo of my 1980s vintage Chinese manufactured side cocker. The little underbarrel mounted LED torch lights the target nicely but the original open sights were hard to see clearly indoors. The homemade OOS shown in the photo solved the problem. The collimated image of the front sight appears as a clear edged dark silhouette against a de-focused and torch-lit background. As the torch lights both the target and the background of the clearly silhouetted front sight you can get by nicely without any separate illumination of the front sight. Also, the fact that it is mounted to give an even lower sight height than the original open iron sights makes it perfect for this kind of shooting.
The outfit shown has a sight height of about 16mm and the rifle is zeroed so the pellet hits where the tip of the aiming point indicates at 6.5 metres. This means the pellet rises only 3mm above point of aim before dropping back to zero at 15m, about maximum range for clean kills.
 My Savage Model 24, a combination gun in 22LR and 410 shotgun calibres, has an identical OOS set up with the same low sight height of 16mm above its’ top, 22 LR, barrel. Using this gun, with .22 ratshot, or the air rifle at very close range usually means quick aim in OEG mode is appropriate. In that case the sight height of about 10mm is almost negligible. This certainly makes hitting small targets in close much easier than with a conventionally mounted red dot with sight height of about 38mm, approximately the amount you must aim over on really close shots. That sight height also means your close range zero, where the trajectory first crosses the sight line on the way up, gets pushed further out so all close targets will require much more care in estimating the amount of holdover.
On both these guns the lens has a focal length of 400mm. You can get these lenses from specs that sell for about $5 in discount stores. The strength rating number in common use allows you to calculate the focal length by dividing it into 1000mm. So +2.5 gives a focal length of 400mm, +2 gives 500mm, and so on. My experience is that the 400mm focal length lenses are the most useful ones available from this source. (Note: Don’t try to use lenses salvaged from prescription glasses as they are rarely simple spherical lenses which is what you need.)
 The front sight on common long arms averages about 800mm from the shooter’s eye and half this distance is often close to an existing rear iron sight base. This makes it more likely that you can achieve the required 400mm spacing between the front sight and the lens without much difficulty in the gunsmithing. As mentioned earlier this spacing provides a clear and parallax free view of the front sight, but also important is the similar distance to the eye from the lens. It turns out that this approximate distance between lens and eye completely blurs all detail other than the front sight as seen through the lens, so there is no distracting background detail surrounding the front sight image.
Finding the optical centre of the lens is necessary before trimming the edges to the shape needed to mate with it’s mounting. Optical dispensing businesses have instruments that will accurately mark the position of the optical centre of the lens in a jiffy. Or, you can find the centre yourself by the following method. Look squarely through the lens at a straight object like an eye height vertical section of a doorframe. Now move the lens from side to side till you find where the vertical edge seen through the lens lines up with the rest of the edge seen above and
below the lens. Mark this line across the lens with a non-permanent marker then rotate the lens 90 degrees and repeat the process. Where the lines cross is the optical centre.
In theory the lens should be mounted slightly further from the front sight than its’ focal length which refers to an infinity focus. As target distances become shorter there will be a point where parallax error will start to be noticeable. The remedy is to increase the front sight to lens distance slightly. In practice you need only check that your lens spacing that gives no apparent parallax error at your maximum range. Then even obvious parallax in closer won’t amount to much in terms of millimetres on the target.

OOS outfits have particular requirements concerning the shape of the front sight/aiming indicator. This is because of the feed back you need to put your eye position right for a careful 6 o’clock hold. Square topped front sights will need replacement or modification as they do not work (other than in OEG mode) in the OOS system. The reason is that the image of the flat top front sight, as seen through the lens, disappears off the top edge of the lens by varying amounts that are impossible to judge, so you have no indication of how high you are holding on the target. Round bead front sights will work as you can judge where a missing round top part is from the lower part still visible. Better still is a coarse picket shape with long 45-degree shoulders. Even if the apex momentarily disappears over the top of the lens the intersection point of the shoulders is easily judged.

I’ve settled on this type of front sight for three of the four OOS equipped guns I have in use at the moment. The exception is my 12ga shotgun on which I am experimenting with a lens clipped onto the sighting rib to collimate the existing round front bead. The OOS so formed will remove the need for perfect head positioning and stock fit but may interfere with other important dynamics of shotgunning. A good compromise may depend on using the smallest lens that will do the job in OEG mode.
My fourth OOS equipped gun is a S&W Model 17 revolver (22 LR). This is licensed and used for primary production so needs to be rugged, and compact enough to be holsterable. At the same time some improvement on the standard iron sights was desirable to make the gun as useful as possible. The challenges of using as-issued handgun sights accurately are well known and the OOS installed has proven to be a big improvement to the point where sighting is no longer the limiting factor. The problems of wobbly holding and clumsy trigger release remain but even these are managed better with the OOS giving a clearer indication of where the gun is pointing. There was no improvement in speed of target acquisition by use of the OOS system but neither was it inferior to standard open sights in this regard. Simply bring the front sight down so that it sinks below the horizon represented by the top edge of the lens.

As photographed the end result of my sightsmithing effort shows a streamlined piece of 20mm SHS steel screwed to the bridge (standard rear sight removed). This houses the essential lens glued onto a crude zero adjustment platform mounted along the
bottom of the tunnel through the SHS. The top half above the lens is open for a direct view of the target. A daub of metal powder epoxy was applied to the top of the front sight so a picket point could be formed without removing any original metal. This retains the option of converting back to the factory sight.
Shooting this outfit from a sandbag rest demonstrated the ability to put five shots into 30mm groups at 25 metres. This got me the job of making OOS sights for two Ruger pistols owned by others and used at a pistol club. One of those is also photographed.
 Building the handgun sights was a bit more difficult than for the long guns. It required lens strengths of +5.5 and +5.0 dioptre (focal lengths of 181.8 mm and 200 mm) which is outside the range available in the above mentioned $5 spectacles. I was fortunate in having the help of Tania Hickmott who runs ICUC, an optical dispensing business in Gympie (Phone 07 54836000). She not only provided optical trade stock lenses but marked their optical centres for me. Putting clear sticky tape over the optical surfaces protected them during the edge shaping operation. The transparency of the tape allowed me to still see where to cut in relation to the optical centre so as to get the sight alignment right. As all the lenses used are made of plastic it was fairly easy to shape the edges with a hacksaw and then a mill file. Elevation adjustment is by trial and error. Start with the optical centre of the lens a bit high. Then after test firing with the lens lightly glued in place calculate how much more to grind off the bottom before gluing in permanently. Changing the front sight height would be another way to adjust elevation. Where either the lens or the front sight is mounted in a lateral dovetail slot, windage adjustment is done as normal.
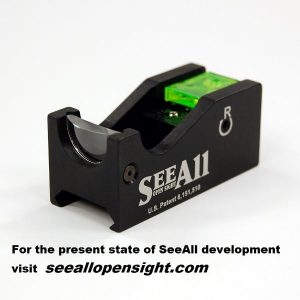 Recently the makers of the SeeAll sight have brought out a low profile version of their sight for handguns and that could be an easier option now. The SeeAll sights use a lens with a focal length something less than 50mm. This allows the units to be self-contained with their front sight built-in. They also have a convenient zeroing mechanism incorporated. The makers of the SeeAll don’t
seem to have established strong marketing arrangements in Australia yet so you might need to e-mail them for advice on availability here or to arrange direct importation. Contact details are on their web site.
A few words on history…. The earliest use of the OOS principle that I know about dates back to the late 1960s when a Swiss pistol shooter named Reiny Ruess used a very strange arrangement on a Hammerli Free Pistol. Instead of seeing a picket shaped front sight through a lens, his system had the image of a black triangle on a white background mounted to face forward from the back-sight
position. This was viewed as a reflection from a rear facing concave mirror mounted at the front-sight position. The parabolic mirror had a focal length to match the distance between it and the triangle’s image and so achieved the same result by reflection as the lens type OOS does by refraction. As to why the Reuss sight died out, I suspect the rules of the Free Pistol competition probably
prevented the development of a lens version to start with and soon banned the mirror idea too when the advantage became apparent to killjoy rule makers.
The OOS principle is commonly used in a miniature form as a means of coarse aiming surveying instruments. Where the target object can be difficult to find in the narrow field of high-powered telescope the little pointer device comes to the rescue. This use goes back to the late 1970s to my knowledge and could possibly have been used earlier. Availability of the SeeAll and the potential for home built versions described here could mean a bigger future for the OOS.
[box type=”shadow” ]Article written by J.S. Andrew – printed with permission. [/box]


Add comment